Welcome to our blog!! We are learning to decorate cakes and loving every minute of it!! Join us by following our journey of designing and decorating cakes! Thanks for your interest and let us know what you think of our cakes by leaving a comment! -- Margie and Joy

Monday, September 26, 2011

White Wedding Cake and Boot Groom's Cake

Wedding Cake with Calla lilies

     Christina and Brandon ordered a solid white cake with fondant and pearls, and with gum paste callalilies on top.  It was not a hard order... the only problem was, we knew Joy would not be home to help with it.  I did not know if I could do it or not, and my friend Chantelle (and Christina's sister) was so confident in me - more confident than I was! They also wanted a boot cake that was 3 dimensional. After studying the pictures she found online and talking to Joy about the different techniques and whether I could do it by myself, I decided to do it.

     I always begin shopping 3 weeks before the wedding to find the best sales on each item each week.  Then the house is cleaned top to bottom and the pets 'quarantined' to two rooms away from the kitchen or they can go down to the basement.  Thursday I started baking and decorating the groom's cake and actually had it covered in fondant and the wooden floor completed.  On Friday morning the major baking started. As each cake cools, it is filled, frosted, and stacked and ready for fondant, as other layers are baking.


Traditional White Wedding Cake
     It took an all nighter Friday night to completely cover each layer with fondant and to also complete finishing touches on the flowers.  Christina chose a different flavor for each layer of cake:  chocolate with raspberry filling, red velvet with cream cheese frosting, lemon with lemon curd, vanilla cake with strawberry filling for the top and bottom layer.  The groom's cake is chocolate with chocolate cream cheese frosting.   It went pretty smoothly with only a few problems, and I actually got a little nap in the middle of all that!  All cakes were covered by 10:00 am on Saturday morning and then I started working on the fondant accents.  At 2:00 pm my husband and I loaded the vehicle and I headed over to stack and finish the frosting and pearls.  This could not be completed before moving or they would fall off, since they are held on by just a half drop of frosting.  I loved the heart topper Christina bought with the idea of adding the calla lilies on top around it.  Each cake tier had a different design, but all seemed to tie in together. Time ran out on the bottom layer, and I had to revise it a little.  We planned to have a frosting lattice, but between the time and my shaky hands from lack of sleep and time running out, I put the pearls where they would have been, and reluctantly left out the frosting lattice work.  It was actually very similar to the top layer then.  Their monogram initials are on the second layer from the top.

The boot was a fun cake to make.  Unfortunately, I forgot a camera in moving everything from the house to the reception, so the pictures you see are taken with a cell phone.  You can't really see the sewing and design work that I put on it,  but you can get the main idea.  The wooden floor is fondant rolled thin and 'painted' to look like wood.  It is actually a different brown than the boot - a reddish brown... so it wouldn't blend into the boot (which it looks like here.)  The reception was very beautiful... one of the most elegant I have ever seen!

It took well over 50 hours of shopping, baking, NS decorating to complete these cakes - not counting the hours spent studying techniques, searching similar designs, etc.  This was the biggest cake I have ever made to date. I had to work through a few problems (no cake is without some problems coming up)... but the biggest lesson I learned through this wedding cake experience... never do a wedding cake without Joy!!  We truly are a team and work well together.  I missed her ideas, thoughts, talents, etc through the whole experience!!    Thanks for looking!!!
Boot Cake on Fondant Wooden Floor

Friday, September 16, 2011

Scrapbook Cake

Scrapbook Cake

 Monte ordered a non-birthday cake for Sandy.  Since it was NOT for her birthday, he said we could make it when it was convenient for us.  Life has been so busy this summer, we just didn't have time!  In fact, we turned down 6 cakes this summer, because we were SO busy and had a really big battle with poison ivy! Joy leaves in two days and will be gone for 2 months... we decided to get this cake made before she left!

This cake was mostly designed by Monte.  He looked online and found the potato paper, that you can print on with edible ink.  He ordered it and printed the pictures for us.  He also asked for a scrapbook with things like: the
Green Bay Packer Logo, a smiley face, a lilly, and  
Scrapbook Cake with Edible Pictures!
suggested a camera setting on top too, if we had time.  We did not get to the camera... as you can see!

The Green Bay Packer Logo is made by hand with fondant.  The smiley face is also made by hand with fondant. The Lily is made with gum paste and food coloring. The Albanese gummy bears are made with Stampin' Up stamps on potato paper with food writers and/or food coloring.  The coffee cup is also made the same way.  The flowers at the bottom of the scrapbook page is also Stampin' Up stamps on fondant.   The cover of the book is fondant and potato paper.  This was a fun cake, but took a LOT of time to complete... more than we expected!!

Happy UNbirthday Sandy!!

Tuesday, September 13, 2011

Flowered Wedding Cake and Hawkeyes Groom Cake

Wedding Cake with Gum Paste Flowers
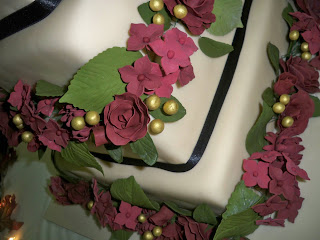
 9 -10 -11 was the wedding date for Eric and Debby L.  She asked Joy and I to make her wedding cake and she designed it herself.  She gave me a simple drawing and wanted the flowers to match the bridesmaids bouquets.  There were roses, mums,  hydrangeas, leaves, and gold balls in the bouquets.  We wanted to get a sooner start on the flowers, but since we were both dealing with poison ivy, we waited to get that healed up first. It was great to find a few 50% off sales at Michael's to help with purchasing some of our ingredients, colors, paints, etc.  We got started about a week before making gum paste flowers.  We enjoy making gum paste  
 flowers, but found it difficult to get the right color.  Gum paste dries SO much lighter than when it is fresh!!   We actually found that we had to make the color almost black for it to dry the colors you see.  We also had a hard time getting it the right shade.  Although the top of the color container shows the right color, the color that you get from the bottle is VERY different!  We had to add a LOT of red to try to get the color we wanted, and still think we could have added more red possibly!  We were not 100% please with the burgandy/red color, but it was close enough.  The flowers and leaves were made with gum paste, the gold balls are made with fondant and colors with edible airbrush paint.  She requested marble and white cake for the four layers of the main cake. 
 Another thing we learned from this cake is that gum paste flowers take much time and patience!!  We spent about 4 days on the flowers.  Friday was baking day, and the Saturday of the wedding, we covered them with fondant, stacked them, and decorated them.  They also asked for a monogram, so we picked colors to compliment the cake.  The oval base under the letters was done by Joy's Cake CriCut.  It took a few tries to get the right size!! 
You can see a few close up pictures of the flowers and more pictures on our facebook page.

Eric designed the groom's cake.  His college team is the Iowa Hawkeyes and he wanted their football field for the cake.  We started looking online to see how other people made football field cakes.  We learned quickly that most women made these cakes and they were misshaped and not to scale.

We felt pretty much on our own and discussed several options to making a football field. 


Iowa Hawkeye Cake
We took the measurements for a football field and reduced them down to the size of our cake.  We baked a chocolate cake and covered the whole cake in green fondant, then put strips of fondant in two tones for the field.  The end zones are black fondant with yellow letters made with gum paste on Joy's CriCut machine.  We had to hand make the hawkeye emblem.  The lines and numbers are piped with white butter cream, and the one thing we would like to revise if we do another football field.  Green butter cream is piped with a grass tip around the edges of the cake.

Thanks for looking and please leave us a comment!